
Table of Contents
ToggleResin Calculator: How to Calculate the Exact Amount of Epoxy You Need
A resin calculator works out exactly how much epoxy resin and hardener you need for a project, based on the dimensions you enter and the type of pour you’re doing. Whether you’re doing a flood coat on a table, a deep pour for a river table, or filling a casting mold, the calculator converts your length, width, height, and coat thickness into a precise volume, then splits that volume into resin and hardener according to your product’s mix ratio. The result is a number you can trust before you crack open a bottle — not a guess that leaves you short mid-pour or drowning in leftover mixed epoxy.
Resin CalculatorProfessional Epoxy Estimator
Units
Select Project Type
01 Dimensions
in
in
in
Typical: 1/16" (0.0625) to 1/8" (0.125)
in
in
in
in
in
fl oz
in
in
in
in
Leave blank to calculate channel fill only
in
in
coats
in
Standard flood coat: 1/8" (0.125 in) per coat
02 Mix Settings
:
%
Recommended: 10–15% coating · 15–20% casting
g/mL
Typical epoxy: 1.0–1.2 g/mL | Polyester: ~1.1–1.3 g/mL
Quick Reference
1 gal covers ~12.8 sq ft @ 1/8"
Please fill in all required fields.
Calculation Results
Table Coatingrelated hobby & diy calculator
How to Use the Resin Calculator
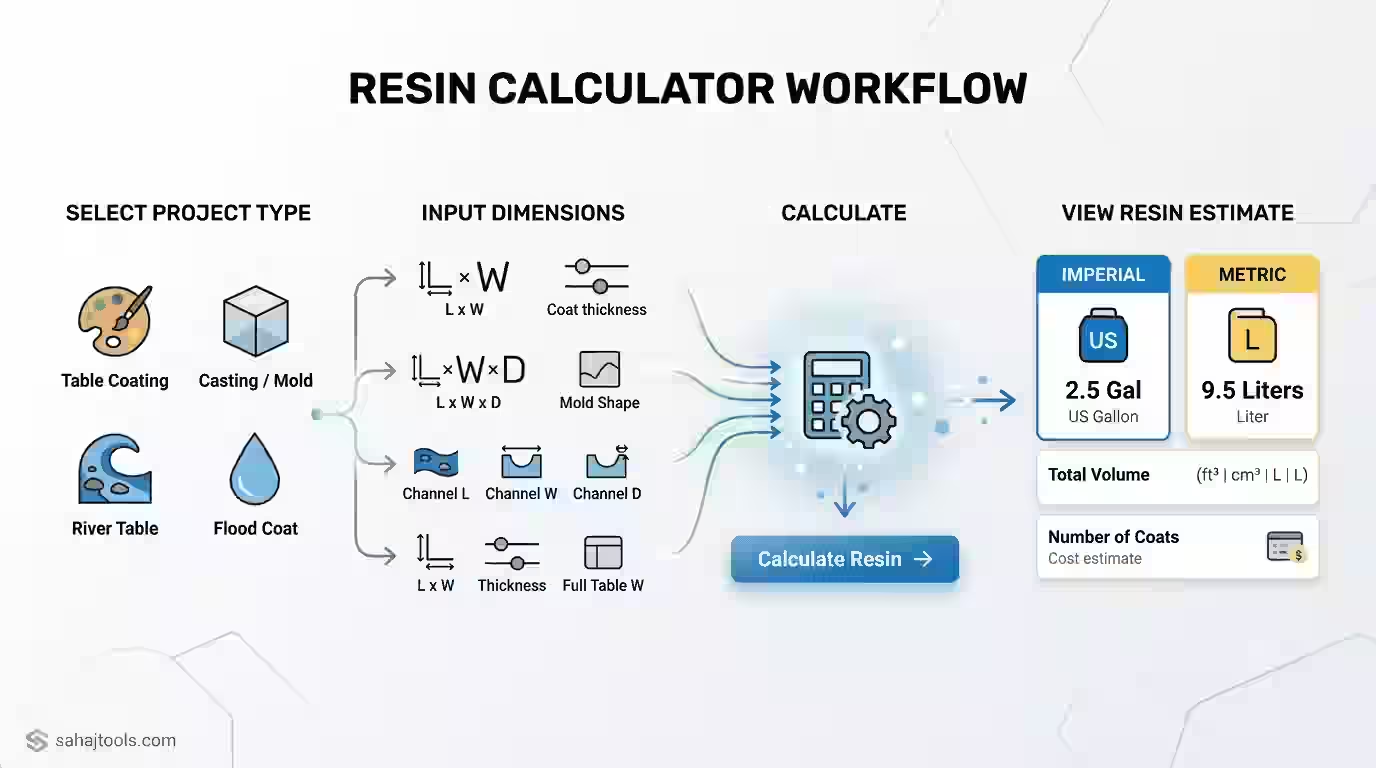
Getting an accurate number out of a resin calculator comes down to entering the right inputs for your specific project type. Most tools, including this one, start by asking which kind of pour you’re doing, since a table coating and a deep casting mold use two completely different formulas.
- Select your project type — Table Coating (thin surface layer), Casting/Mold (deep pour and 3D forms), River Table (channel fill plus optional seal coat), or Flood Coat (full surface pour).
- Enter your dimensions — length and width for flat surfaces, or length, width, and channel depth for a river table. Casting projects add a mold shape selector (rectangular, cylindrical, spherical) plus height/depth.
- Set your coat thickness — for flood coats and table coatings, a standard layer runs about 1/8 inch (0.125 in) per pour; thinner coating layers may run closer to 1/16 inch.
- Choose your mix ratio — most epoxy systems run 1:1 by volume, though some casting resins call for 2:1 or 3:1. Check your product label, not the default.
- Add a waste/overflow factor — 10–15% for coating projects, 15–20% for casting- to cover mixing cup residue, dripping, and mold overflow.
- Confirm resin density — typical epoxy sits between 1.0–1.2 g/mL, with some polyester resins running 1.1–1.3 g/mL. This number matters if you plan to measure your resin and hardener by weight on a scale rather than by volume in a cup.
Once those fields are filled, the calculator returns your total resin volume, hardener volume, and total mix volume — plus, for weight-based mixing, the equivalent weight in grams or ounces.
How It Works: The Resin Calculation Formula
At its core, every resin calculator is doing a volume calculation first, then a ratio split second.
Step 1 — Find the volume.
For a flat surface (table coating or flood coat):
Volume = Length × Width × Thickness
For a river table channel:
Channel Volume = Channel Length × Channel Width × Channel Depth
For a casting mold (rectangular):
Volume = Length × Width × Height
Cylindrical and other mold shapes use their own geometric volume formulas (radius² × π × height for a cylinder, for example), which is why a dedicated resin mold calculator usually includes a shape selector rather than a single length/width/height field.
Step 2 — Convert volume to resin quantity, then apply overage.
Once you have a volume in cubic inches (or milliliters/liters if working metric), the calculator converts that to fluid ounces or milliliters of resin needed, then adds your waste/overflow percentage on top. As a quick mental benchmark: one gallon of resin covers roughly 12.8 square feet at a 1/8-inch coat thickness — useful for sanity-checking the calculator’s output before you order supplies.
Step 3 — Split by mix ratio
If your product uses a 1:1 resin-to-hardener ratio, the total mixed volume splits evenly. A 2:1 ratio means two parts resin for every one part hardener, and so on. This is also where resin mixing by weight vs. by volume becomes relevant: because resin and hardener don’t always share the same density, measuring both components by weight on a gram scale is generally more accurate than measuring by volume in a cup, especially for ratios other than 1:1.
A Note on Safety Before You Mix
Before you get to the worked example, it’s worth pausing on the safety side of resin work, since this is the point in the process where it actually matters. Liquid epoxy resin and hardener can cause skin sensitization with repeated or prolonged uncured contact, so nitrile gloves and safety glasses are standard practice, not optional extras. Work in a ventilated space — resin and hardener release VOCs during mixing and curing, and a stuffy garage or closet isn’t sufficient airflow for larger pours. For deep pours in particular, keep an eye on exotherm: thick, single-pour epoxy generates its own heat as it cures, and pouring too much at once can cause overheating, cracking, or discoloration, which is exactly why deep pour and river table projects are typically poured in layers rather than all at once.
Worked Example: Calculating Resin for a River Table
Say you’re building a river table with a walnut slab and a resin channel down the center.
- Channel length: 72 inches
- Channel width: 6 inches
- Channel depth: 1.5 inches
- Mix ratio: 1:1
- Waste factor: 15% (deep pours warrant a bit more buffer than a simple coat)
- Resin density: 1.10 g/mL
- Step 1 — Volume: 72 × 6 × 1.5 = 648 cubic inches
- Step 2 — Convert to fluid ounces: 648 cu in × 0.554 fl oz/cu in ≈ 359 fl oz
- Step 3 — Add 15% waste factor: 359 × 1.15 ≈ 413 fl oz total mixed volume needed
- Step 4 — Split by 1:1 ratio: ≈ 207 fl oz resin + 206 fl oz hardener
- Step 5 — Convert to weight (optional, for scale-based mixing): 413 fl oz ≈ 12.2 liters × 1.10 g/mL ≈ 13,420 grams total, split roughly 6,710 g resin to 6,710 g hardener at a 1:1 ratio.
Because this is a deep channel rather than a thin coat, that volume should be poured in stages — typically no more than about 2 inches per layer for standard deep-pour epoxy — rather than in one continuous pour, both to manage exotherm and to reduce the risk of trapped bubbles.
Understanding Your Results
The numbers a resin calculator returns aren’t just a shopping list — they tell you how the project needs to be executed. A total mix volume close to a full kit size means you can likely do the pour in one session; a number that spans multiple kits or bottles means you’ll be mixing in batches, which matters for color and pigment consistency across a project. The resin-to-hardener split is non-negotiable: even a slightly off ratio (say, eyeballing “close enough” to 1:1) is one of the most common reasons a cured piece stays tacky or soft. And the coverage-rate context — roughly 12.8 square feet per gallon at 1/8 inch — is a useful gut-check any time a calculated number looks unusually high or low for the project size you’ve entered.
Common Resin Mixing Mistakes and Pro Tips
Mistake | Why It Happens | Fix |
Under-catalyzing (too little hardener) | Eyeballing ratios instead of measuring precisely | Always measure resin and hardener separately, ideally by weight on a scale |
Pouring too deep in one layer | Ignoring the product’s max pour depth | Split deep sections into 1–2 inch layers, letting each cure before the next |
Mixing in a humid or cold room | Not accounting for cure conditions | Work in the resin manufacturer’s recommended temperature range, typically 65–85°F |
Skipping the waste factor | Assuming the calculated volume is exactly what’s needed | Always add 10–15% for coatings, 15–20% for castings, to cover cup residue and drips |
Not accounting for pot life | Mixing a large batch and running out of working time before pouring is finished | Check your resin’s stated pot life and mix smaller batches for large projects if needed |
Pro tip: if you’re new to resin work, do a small test batch — a coaster-sized pour, for instance — with a new resin brand or ratio before committing to a full table top or large casting. It’s the fastest way to confirm your scale, ratio, and working time assumptions before the stakes (and the volume) get bigger.
Frequently Asked Questions
Multiply your project's length, width, and thickness (or depth) to get a volume, convert that to fluid ounces or milliliters, then add a waste factor of 10–20% depending on whether you're coating or casting.
Multiply the channel's length, width, and depth to get the channel volume, then add roughly 15% for waste. If you're also adding a seal coat over the full table width, calculate that separately as a thin flood coat.
Treat it as a flat-surface flood coat: length × width × desired coat thickness (typically 1/8 inch), then add your waste percentage.
Use each shape's specific volume formula — for example, a cylinder is radius² × π × height — rather than a flat length × width × height calculation, since standard rectangular math will overestimate or underestimate curved or tapered molds.
This varies by product — common ratios are 1:1 and 2:1 by volume — so always check the manufacturer's technical data sheet rather than assuming a standard ratio applies.
Weight is generally more accurate, especially for ratios other than 1:1, since resin and hardener don't always share the same density and volume-based cups can introduce measuring error.
Break the total depth into layers of about 1–2 inches each, letting each layer reach a tacky-but-stable cure stage before adding the next, to manage heat buildup and avoid cracking.
A 10–15% buffer is standard for coating projects, while casting and deep pours typically warrant 15–20% given mold overflow and cup residue.
Pot life is the window of time your mixed resin stays workable before it starts to thicken; it's stated on the product's technical data sheet and shortens in warmer rooms or with larger mixed batches.
Treat small art pieces the same as a mini flood coat or shallow casting — length × width × thickness for panels, or the mold's specific shape formula for coasters and geode-style pours.
A seal coat is a thin layer, usually calculated the same way as a flood coat over the exposed wood surface area, at a fraction of the thickness used for the main river channel.
Last Update: July 2026