
Table of Contents
ToggleWater Flow Rate Calculator: Find GPM, LPM & m³/h in Seconds
If you need to know how much water is actually moving through a pipe, hose, or well, the fastest way to find out is with a water flow rate calculator. Whether you’re running a bucket test on a well, checking pipe velocity, or estimating drawdown from a pump test, this tool converts your raw measurements into a clean flow rate in GPM, L/min, L/s, m³/h, or CFS — no manual formula-crunching required.
Water Flow Rate Calculator
Professional well analysis — bucket test, pumping test, pipe flow & casing storage in one place.
1 Choose Calculation Method
2 Enter Measurements
ℹ️Hold a container under your well outlet, time how long it takes to fill, then enter the data below.
Average multiple runs for accuracy
ℹ️Measure static water level before pumping, then pumping level during steady-state pumping. Record the pump's output rate.
ft
ft
ℹ️Calculate flow rate through a pipe using pipe diameter and measured water velocity.
Enter 100 for full pipe, or % fill for partially filled pipes
ℹ️Estimate the volume of water stored in your well casing between the pump intake and the static water level.
3 Results
The core relationship behind almost every flow rate calculation is:
Q = A × V (flow rate = cross-sectional area × velocity)
Where Q is the flow rate, A is the pipe’s cross-sectional area, and V is water velocity. So a 4-inch pipe (A ≈ 0.087 ft²) with water moving at 2.5 ft/s delivers roughly 98 GPM. If you don’t have velocity but you do have a bucket and a stopwatch, the simpler bucket test formula works just as well: Flow (L/min) = bucket size (L) ÷ fill time (sec) × 60 × 0.8.
Four Ways to Calculate Water Flow Rate
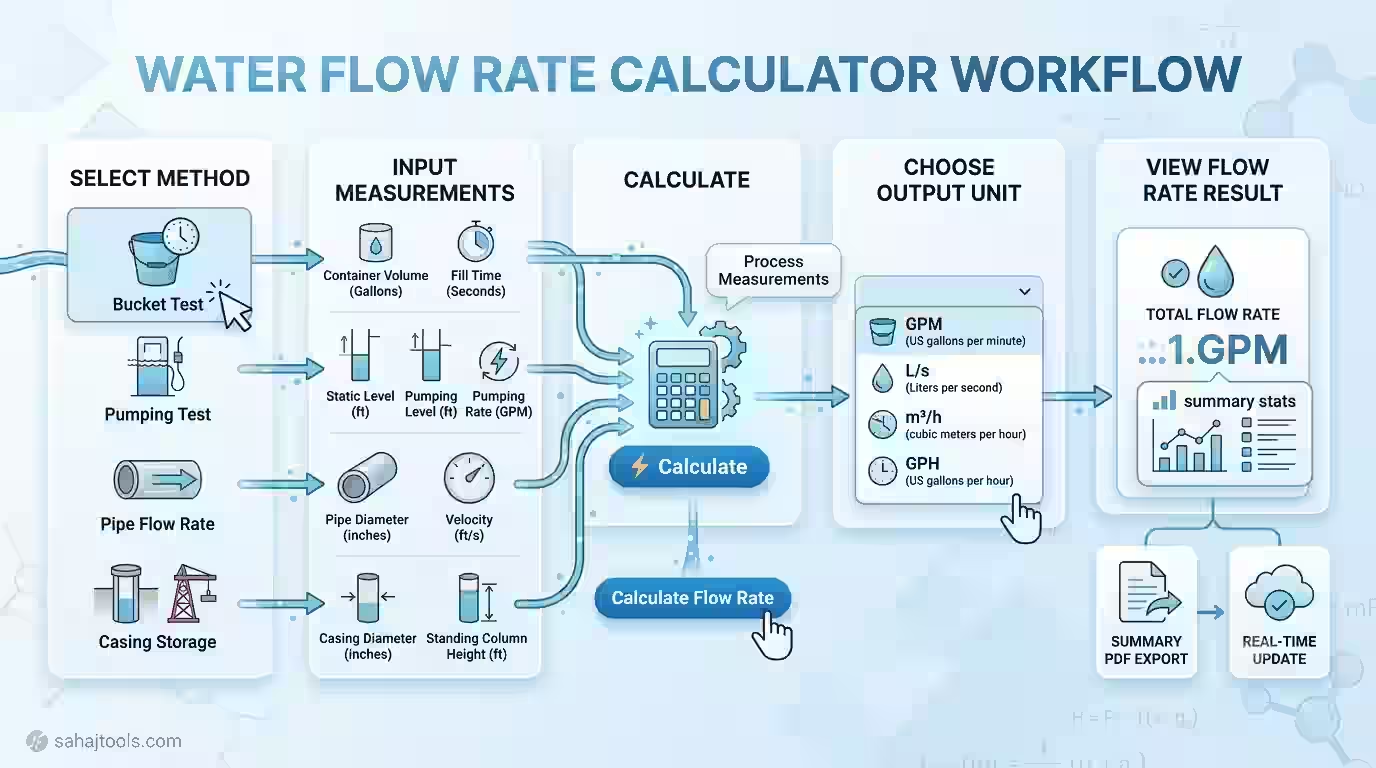
This calculator supports four separate calculation methods, because “how much water is flowing” gets measured differently depending on the setup you’re working with.
Bucket Test (Simple Timed Fill Test)
This is the go-to method for anyone checking a well’s actual output at the tap or spigot — no plumbing knowledge required. You hold a container under the outlet, time how long it takes to fill, and the calculator does the rest. It’s the same water flow measurement using flow meters and bucket-stopwatch method that well contractors have used for decades, just automated.
Pumping / Drawdown Test
This method estimates a well’s sustainable yield rather than a single point-in-time reading. You record the static water level (depth to water before pumping starts), the pumping water level (depth to water once the pump reaches steady state), the pumping rate, and the total well depth. Comparing static vs. pumping levels tells you how much the water table drops under load — a key input for anyone sizing a well pump or evaluating long-term supply.
Pipe Flow Rate (Velocity × Cross-Sectional Area)
This is the pure hydraulic flow rate calculation: velocity times area. It’s the method to reach for when you already have a water velocity calculator reading or a manufacturer’s velocity spec and need to convert it into a volumetric flow rate. The tool also supports partial-fill percentages, since pipes running at less than 100% full deliver less than the diameter alone would suggest.
Casing Storage
This isn’t a flow rate in the traditional sense — it estimates the volume of water sitting in a well casing between the pump intake and the static water level. It’s useful context for anyone trying to understand short-term water availability versus the well’s true recharge rate.
The Water Flow Rate Formula, Explained
For pipe and hose flow, three formulas do almost all the work:
- Cross-sectional area: A = π × (D/2)² — where D is the pipe diameter/bore size
- Flow rate: Q = A × V — flow rate equals area times velocity
- Velocity from flow rate: V = Q / A — rearranged when you know flow rate but need velocity
- Diameter from area: D = 2 × √(A / π) — useful for reverse-engineering pipe size
Worked example: A 6-inch diameter pipe has a radius of 0.25 ft. Area = π × (0.25)² ≈ 0.196 ft². At a measured velocity of 3 ft/s, flow rate = 0.196 × 3 ≈ 0.589 ft³/s, which converts to roughly 264 GPM. This same pipe cross-section area calculator logic applies whether you’re sizing irrigation lines, hose bibs, or well casing.
For a straightforward bucket test, the math is simpler: fill a 5-gallon container in 30 seconds, and your flow rate works out to 10 GPM (5 gallons ÷ 30 sec × 60 = 10 GPM).
How to Use the Water Flow Rate Calculator
- Choose your calculation method at the top of the tool — Bucket Test, Pumping/Drawdown Test, Pipe Flow Rate, or Casing Storage — depending on what data you have on hand.
- For a Bucket Test: enter your container volume (e.g., 5 gallons), the fill time in seconds, and optionally the number of test runs to average for accuracy.
- For a Pumping/Drawdown Test: enter the static water level, pumping water level, pumping rate (in GPM), and total well depth, along with their units.
- For Pipe Flow Rate: enter the pipe’s inner diameter and its unit, the measured flow velocity, and the fill level percentage (use 100 for a full pipe, or a lower number for partially filled pipes).
- For Casing Storage: enter the casing’s inner diameter and the standing water column height.
- Select your primary output unit — GPM, L/min, L/s, m³/h, or CFS — from the dropdown.
- Hit Calculate, or leave real-time calculation checked to see results update instantly as you adjust values.
Understanding Units: GPM, LPM, L/s, m³/h & CFS
Different industries default to different units, and this water flow rate GPM calculator (gallons per minute) handles the conversion so you don’t have to. In the U.S., GPM is standard for wells, pumps, and residential plumbing. Metric regions typically use L/min or L/s, while industrial and municipal systems often report in m³/h. Larger-scale or scientific contexts may use CFS (cubic feet per second). The distinction matters because volumetric flow rate (volume per time) is different from mass flow rate (mass per time) — for water at typical temperatures the difference is usually negligible, but it’s worth knowing they aren’t the same measurement.
Flow Rate in Pipes, Hoses & Fixtures
Pipe diameter has an outsized effect on flow: because area scales with the square of the radius, doubling a pipe’s diameter roughly quadruples its carrying capacity at the same velocity. This is why plumbing pipe sizing calculator logic always starts with diameter before anything else. For hose flow rate specifically, bore size, water pressure, and hose length all interact — a longer hose with the same bore and pressure delivers less flow due to friction loss in pipes, which is why pressure drop increases with length and tighter bends.
For whole-house or fixture-level planning, plumbing codes use fixture units (a standardized loading value) rather than raw GPM, then convert fixture unit totals to an expected L/s or L/min demand using published fixture unit to flow rate tables. This fixture unit to flow rate calculator approach is how designers size a home’s main water line without measuring every tap individually.
Where This Calculator Gets Used
Beyond household plumbing, water flow rate calculations show up constantly in:
- Well and water supply testing — bucket tests and drawdown tests to verify a well’s sustainable output
- Irrigation system flow rate sizing and testing — sprinkler and drip-line design depends on knowing available GPM at the source
- Pump and hydraulic system sizing — matching a pump’s rated output to actual system demand
- HVAC and fluid systems — flow rate calculations for water-based heating and cooling loops follow the same Q = A × V logic used for water and, with adjusted assumptions, air
Common Measurement Mistakes to Avoid
- Timing too short a fill in a bucket test — under 10–15 seconds introduces meaningful timing error; run multiple tests and average them.
- Ignoring partial pipe fill — a pipe that’s only 60% full doesn’t carry 60% of its rated full-flow capacity in a simple linear way, which is why the fill-level input matters.
- Confusing static and pumping water levels — mixing these up in a drawdown test will throw off your yield estimate entirely.
- Using outer diameter instead of inner diameter — pipe walls take up real space; always measure or look up the inside diameter.
Frequently Asked Questions
Use Q = A × V. First find cross-sectional area with A = π × (D/2)², then multiply by the measured velocity. A 4-inch pipe at 2.5 ft/s velocity yields roughly 98 GPM, for example.
Time how long it takes to fill a container of known volume — a 5-gallon bucket, for instance — then divide volume by fill time and multiply by 60 to get GPM. Run it 2–3 times and average for accuracy.
It depends on velocity, which pressure influences but doesn't fix directly. For a known velocity, multiply it by the pipe's cross-sectional area (A = π × (D/2)²) to get GPM; pressure alone isn't enough without a velocity or head-loss calculation.
The same Q = A × V formula applies; only the unit conversion changes. Enter your diameter and velocity in metric units, or use the calculator's output unit dropdown to convert automatically from GPM.
Larger diameter increases flow capacity because area scales with the radius squared. Longer pipe length increases friction loss, which reduces flow rate for a given pressure — this is why long hose runs deliver less than short ones at the same source pressure.
Volumetric flow rate measures volume moved per unit time (GPM, L/min); mass flow rate measures mass moved per unit time. For water near room temperature, the two track closely since density is nearly constant, but they diverge for fluids with variable density.
Start with the fixture units or GPM demand of everything downstream, then use published plumbing pipe sizing tables or fixture-unit-to-flow-rate charts to select a diameter that carries that demand at an acceptable velocity.
A bucket test is generally accurate within 5–10% when timed carefully over multiple runs, which is reliable enough for most household and well-yield checks — though professional flow meters remain more precise for engineering-grade decisions.
Water flow rate boils down to one core idea — Q = A × V — whether you’re timing a bucket fill, comparing static and pumping well levels, or measuring straight pipe velocity. This calculator handles all four common measurement approaches and converts the result into whichever unit (GPM, L/min, L/s, m³/h, or CFS) your project calls for, so you can move from raw field measurement to a usable number in one step.
Last Update: July 2026